Showing posts with label denim. Show all posts

Tuesday, July 9, 2013

Tutorial Tuesday: Denim Tote from Left Over Pockets


Hello and welcome to Tutorial Tuesday! I am continuing with my denim destashing and giving you this denim tote from random pockets I have been saving from hubby's worn out pants.

 Here are the pockets, four in total; two regular and two that have a fold-over flap.


I decided to attach the regular pockets to one of the fold-over flap pockets.
voila

I then opened up the other pant leg with the other fold-over flap pocket and sewed each side to the sides of the regular pockets. 

This forms a box with no top or bottom.

With extra denim lying around, I made a lining for the tote. I cut out two rectangles; one for the bottom and the other for the lining of the tote.  I sewed one all around the square-like form of the pockets.

Now, for the lining, in addition the rectangular bottom piece, I cut out the same shapes as the pockets from extra denim, sewed them together like I did the tote. It's like making another separate tote.


Then you attach the lining to the actual tote, right sides together. 


Make sure you leave a little extra space to turn inside out.


This is what it looks like turned inside out


How it looks when you put the lining inside. 


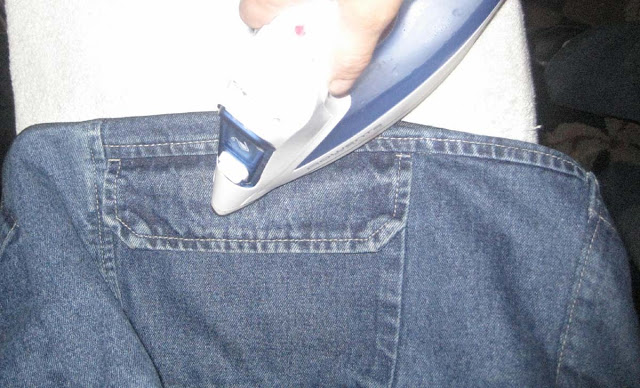
Now iron all around the top part of the tote. We'll start making the straps.


I used the leg of a pant for the straps about two inches wide. Fold each, the long way, stitch right sides together and then turn inside out. If your denim is too thick, I would just topstitch each strip with ends folded in.


This is what you get. Two strips for straps.

Determine placement and put the ends in between the lining and the tote.

Then topstitch all around.

This is what it looks like at this point. I wanted to add a little more interest though.

I still had the top part of some other pants I reconstructed earlier.

I cut two  bands from the tops of two different pants. I also cut the loops off.

This is what they looked like after I finished.

 I attached the bands together and sewed them to the top of the tote.

Voila again!

I love these shots! I had to take my "after" pictures with my kids in tow. Sumer camp had not yet started last week. 

Flexing my mommy muscle! lol. So glad my yard is enclosed and Dan can't run away while my oldest takes pics!

"yes, you can get your car from my tote!"

Thanks for reading!Tell me what you think.

Saturday, June 22, 2013

Jumpsuit from Recycled Boy Jeans

As promised in my previous post, here's my denim jumpsuit made from recycled boy pants. 

I used about four boy pants, sized 12-14, for this entire jumpsuit. 


The pattern was self drafted using this inspiration photo.

Front panel from a pant leg. I cut two of these.

Back from another pant leg.
For the waistband, I used recycled jersey from a t-shirt and I made the pant legs using one of my low-waisted pants as a pattern. I am happy with the outcome although I think I might make it a little shorter. 


I will definitely wear this in the neighborhood to run errands, at the playground with the boys, even the beach. It would look good with a swimsuit underneath. 

I look at each and every comment and appreciate your feedback! 


Tuesday, June 18, 2013

Tutorial Tuesday: Super Easy Denim Shoulders

As I mentioned in my previous post, I have been fabric stash busting. One of the bins I started to look through was my denim stash bin. 

I have soooooo much denim! From scraps to full pants handed down from my husband, my son, our cousin who hands them down to our son, etc. Believe you me,  am not complaining because I LOVE denim, but alas, I needed to start making some stuff with it. 

First up, denim shoulder pads. I love a strong shoulder, especially since I don't have them. Mine slope down so I love pads, puff sleeves, anything that will accentuate them. 

Here's a super easy tutorial that will do just that. 


I used an actual shoulder pad I took out from a dress as my pattern. I laid it down on two pieces of denim scraps, right sides facing each other. You need to do this twice.


I sewed around the edges starting in the middle of the semi circle and leaving an opening so you can turn it later. 


Turn and topstitch


That's it. I sewed them on a tank top aligning the edge of the denim pad to the edge of the tank top strap. 


 It does add some interest to a regular black tank.  
Don't you think? 

Stay tuned for my next post where I show you my jumpsuit made from boys pants!

Tuesday, April 9, 2013

Tuesday Tutorial: Denim Sewing Machine Cover from Jeans


One thing I learned about spring break, or any break for that matter, is that my stuff needs protection! This sewing machine cover was long overdue. I am not sure why I  didn't do this earlier. I guess Dan unraveling my thread for the upteenth time during break caused a crafty craze that had me searching for the nearest fabric and whip up armor for my defenseless machine.


The closest fabric was in the form of these jeans. Thank God they were in a pile to be reconstructed anyway. Otherwise, I would be showing you some flowery machine cover made from a dress or a plastic one made from a shower curtain. Lol!  These were given to my older son by his cousin. They were too small and he has trouble with button closures anyway so it was a perfect fit.


After I measured my machine, I ascertained that I can cut the pant legs right here.


I cut through the inseam of each leg and this is what I am left with. These will be the front and back of the cover.


Then I cut the waist band off of the top


Then I cut the back part of the pants starting with the middle seam and continuing down the inseam of each side. I was left with this. These will form the sides of the cover.


This is what is left of the front, I did not use this part.


I then stitched the two pieces together.


I also cut the seam bulk from the bottom of the pants for easier sewing. This then goes draped over the machine.  I simply sewed the edge of the top and bottom parts of the pants around the edges of the back pockets to make the sides.

Here you have it! My new denim sewing machine cover.


Here's a side view to show you where the pockets went. 

Mission accomplished: PROTECTED!

Now Dan doesn't have a chance against my third child, my sewing machine! Lol.

As always, tell me what you think. I appreciate your feedback.