Showing posts with label tutorial. Show all posts

Tuesday, January 14, 2014

Tuesday Tutorial: Infinity Scarf from Sweater

Curl shrinkage is real people!
I usually cut my hair during the winter. I don't really notice the "shortness" of it because my hair shrinks about 4 inches when it's curly. When I do the winter cut, I simply flat iron it straight and I have long hair again. But this year is different. I want my hair to be long and curly by the time the summer rolls around so I need to keep the scissors at bay. The problem with that is that I won't have the option of winter straight hair because by now it has lost it's shape and looks too long and lifeless. So winter curly hair it is.  

I apologize for the blurry iPhone pic. 
I decided I needed a thick scarf that would cover my ears since hats tend to flatten my curly hair. If I need more warmth,  I also have my hood as a back up. Here is a tutorial on how to make a thick infinity scarf from a sweater. 

  I started with a large sweater

 I cut the arms off

 I opened them up

 I cut the body in half

 Then I cut the top of each half like so.

 I opened up each torso half and lined them up bottom to bottom.

 I stitched them, right sides together.

 I then added the opened sleeves on the bottom and sewed.


 Then I cut the inside of the sleeves to make it even with the sides it was sewn to.

 Fold in half and sew along the edge of the top making a tube.


 With right sides together, sew the ends to make a round tube.


I had my hair straight in the left photo, thus the hat. The scarf is wide enough to cover my ears and I can even put it over my head in case it gets super cold, like it did a couple of weeks ago.
 I really love it.

What do you think? How do you keep warm in the winter? Hat? Hood? Thick scarf?

Tuesday, October 29, 2013

My Very First Hat Pattern and Tutorial for Sale at Nelesc Designs

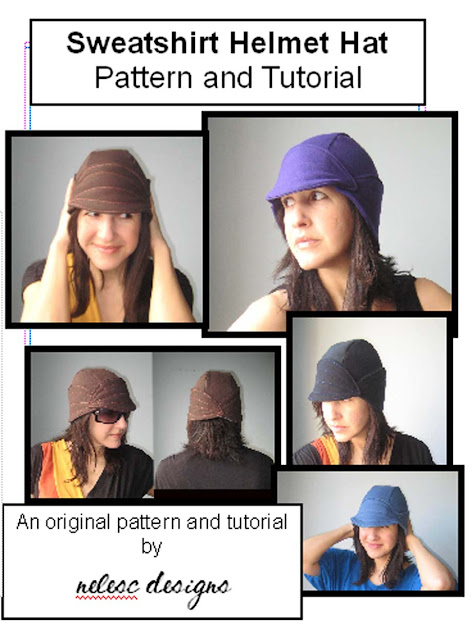
I know that I wrote about my Helmet Hat Pattern/Tutorial back in April but since it's getting nippy out there, I thought I would reintroduce today. I love this hat! It's a great autumn/winter wardrobe staple and is available in my shop, for a limited time, for $5.00!  


If you have read my "about" page, you know I have been wanting to start selling my patterns and tutorials. I have enjoyed sharing my knowledge here through my free tutorials every other Tuesday and now I would like to expand on that through the tutes I'll be offering through my shop. These tutes will be more extensive and some will include actual pattern pieces as this new tutorial does. 


 This unlined hat is composed of a base with the surrounding leaf shaped pieces appliqued on. The leaf pieces are quilted with thread. The pattern/tutorial shows you how to make a HELMET HAT that fits a 22 to 24 inch sized head. 


This 27 page HELMET HAT pattern/tutorial includes color photographs, step by step SIMPLE tutorial instructions, and three pattern pieces that print onto multiple sheets. You will then need to match the triangles, connect them correctly, and then tape them together.


As you also know, I like to refashion garments so this helmet hat was designed to be made from upcycled/recycled fabric like sweatshirts or t-shirts. It gives you a chance to reuse those sweats and tees you have around the house. However, you can use most fabrics with this pattern/tutorial, new or old.

Since I launched in in April, I have had several sales of this pattern. This is what one customer said, 

"The tutorial downloaded safely, thanks - and it looks to be very detailed and comprehensive. Now to decide which sweatshirt is to be sacrificed first." 

So there you have it, and, until Nov. 5, you will be able to get this pattern/tutorial for only $5.00 in my shop. After that, it will go up to $8.99. 

If you decide to purchase it, please let me know what you think. I am also, always here to help if you need it. 

Tuesday, April 9, 2013

Tuesday Tutorial: Denim Sewing Machine Cover from Jeans


One thing I learned about spring break, or any break for that matter, is that my stuff needs protection! This sewing machine cover was long overdue. I am not sure why I  didn't do this earlier. I guess Dan unraveling my thread for the upteenth time during break caused a crafty craze that had me searching for the nearest fabric and whip up armor for my defenseless machine.


The closest fabric was in the form of these jeans. Thank God they were in a pile to be reconstructed anyway. Otherwise, I would be showing you some flowery machine cover made from a dress or a plastic one made from a shower curtain. Lol!  These were given to my older son by his cousin. They were too small and he has trouble with button closures anyway so it was a perfect fit.


After I measured my machine, I ascertained that I can cut the pant legs right here.


I cut through the inseam of each leg and this is what I am left with. These will be the front and back of the cover.


Then I cut the waist band off of the top


Then I cut the back part of the pants starting with the middle seam and continuing down the inseam of each side. I was left with this. These will form the sides of the cover.


This is what is left of the front, I did not use this part.


I then stitched the two pieces together.


I also cut the seam bulk from the bottom of the pants for easier sewing. This then goes draped over the machine.  I simply sewed the edge of the top and bottom parts of the pants around the edges of the back pockets to make the sides.

Here you have it! My new denim sewing machine cover.


Here's a side view to show you where the pockets went. 

Mission accomplished: PROTECTED!

Now Dan doesn't have a chance against my third child, my sewing machine! Lol.

As always, tell me what you think. I appreciate your feedback.  

Tuesday, March 12, 2013

Tutorial Tuesday: Turning Fashion on its Head; Upside Down Jacket Tutorial


A while back I accidentally put one of my jackets on upside down and voila! A new idea was born. 

I noticed that by putting the bottom part at the top, a very wide collar on a cropped jacket was created. I liked the collar idea but not the cropped part so I decided I was going to reinvent this whole upside down jacket concept. 

I started out with this jacket
that I bought at a thrift store. I knew that I wanted lettering on it because I wanted people to tell that I had turned it upside down. I also wanted it to be green as I knew St. Patricks Day was approaching.


This Audubon Soccer jacket was perfect.  It was green, had lettering, and it also had snaps which could add some interest. I don't know how Coach Accardi (coach's name is in the front) would feel about my refashioning his team's jacket. Oh well. 


I started by cutting it apart; arms are cut and the bottom was cut shorter in the front than in the back.


This is still right side up. I sewed up the lining on the bottom of the top portion and did the same for the bottom.


Then I turned the top and bottom upside down where you get a wider collar on top and on the bottom, you get a triangle hemline. 


I stitched the two halves together this way. I had to create pleats on the middle lower back so the two halves could line up evenly. Can you tell that the collar is the lower back now?


This is what it looks like from the front.


This is how it looks on me

 Front and back.


For the most part, I used the snaps from the original design but I did add 2 snaps at the top and one snap on the bottom of the top part. 
I also did away with the sleeves and simply sewed the green part of the sleeves over the lining turning it into a vest. The upside down pockets are useless now!  

I really liked the way it came out. It's a great vest for transitioning into Spring. Happy early St. Patricks Day!

Tuesday, February 26, 2013

Tuesday Tutorial: Boy Pants from Sweatshirt Sleeves


Rarely, do I sew for my boys. I know, I know, how aweful! I just find male clothing, well, a bit boring. However, my mind was changed when I worked with a really cool male client last year who wasn't afraid to think outside the box in terms of style and really appreciated my design aesthetic. Anyway, I digress, I'll write about that in another post. 

All this to say that for this Tuesday tutorial, I transform sweatshirt sleeves into boy sweat pants! Remember when I made my sweatshirt jumpsuit? I had a couple of sleeves left over and this is what I came up with; a really easy, fun, fast tute:


 I used a pair of Dan's pj pants to outline the shape of the pants. Four piecs make up a pair of pants, two front pieces and two back pieces. Each sleeve will make up a front and a back piece. 


I wanted to sew as little as possible, using the natural shape of the sleeves and the seams already sewn. I cut along the white lines making the shape of the pants.


This is what it looked like after I cut along the white line on each sleeve.


With right sides together, pin the center seam and then sew.


Now you can either fold and add an elastic or attach a waist band.


When I compared them to Dan's current PJ pants, I realized they were too short for me to add an elastic so I pulled out a waistband from another sweatshirt project, 

measured, cut and attached (sewed) it to the pants. I used the waist measurement from the PJ pants. This added a bit more length to them.  


There you have it: boy sweatshirt pants from two sleeves! They were still a bit too short but not as much as they would have been had I folded the waist down and added an elastic like I originally planned. Next time I will use sleeves from a 3X sweatshirt. 

Yes, Dan loves to play with cables! It's one of his little quirks
My model stayed put long enough for me to take a picture of him in his new sweatpants!

I hope you liked this refashion. I particularly enjoyed this one  because I finally made something for my boy. Now I have to make something for the other one to avoid any sibling rivalry!